
ADB stands for is Android Debugging Bridge is a command-oriented communication terminal between PC and Android-powered device or emulator instance. ADB is three step process combined service. So today I have come up to guide you about some selected ADB command and how those controls work on a device. There have many sites available containing ADB command and their usage, but I will try my best to show the simplest procedure to use some ADB command that every Android user should know with an available screenshot.

1. As it is a client server work module, the first component is a Client, Which runs on a development machine. By issuing ADB command to the shell of a device, you can invoke a device from the shell.
2. A Server is a running background process of development machine which manages communication between client and adb demon which running on Android device or emulator.
3. The demon is running background process of an Android device or emulator instance.
To use ADB, you need to enable USB Debugging on your phone. To Enable USB Debugging go to
Phone Settings=>Developer Option=> USB Debugging
(Note: Developer setting is by default hidden in Kitkat and above version of Android, To enable developer option to go to = Phone settings=>About Phone=Tap 7 Times on Build No=Now you have developer option enabled)
Now you have learned how to connect an android device or android emulator in USB debugging mode. The first step is to connect your device or emulator with PC using USB debugging mode.
1. How to open ADB tool?
ADB tool can found in Android SDK, <SDK>/platform-tools/
Alternate Way
Download ADB.ZIP from bellow download link.
Open a command prompt in administrator mode by a simple combination of windows start + x from a keyboard. Select Command Prompt (Admin)

Admin command prompt looks like this:

Now navigate to ADB folder to get ADB command console. It`s easy to find ADB folder when located ADB folder in root directory.

1. Command: ADB HELP
1. Command: ADB HELP
If you want to learn how ADB commands are working you first, need to know the command and their attribute. So I am starting with first ADB command is ADB HELP. By using ADB HELP command, you will know available command in ADB console

2. Command: adb devices
Adb devices command will display your attached Android device. The command is case sensitive write in a small letter. Otherwise, it will show the help list. If multiple devices are connected, use adb -s DEVICE_ID to target a particular appliance.

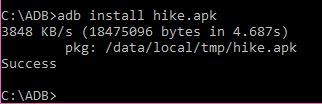
3. Command : adb install <application_package_name>
The command adb install will install an application package to your attached device. For easier navigation to the application package put that apk file into the ADB directory. Then you need not define the apk package destination.
4. Command : adb uninstall <application_package_name>
The command adb uninstall will uninstall the desired package from your connected device and in this case a uninstall confirmation notification will appear, and you have to confirm it manually.
5. Command: adb get-serialno
This ADB command adb get-serialno will display your Android device serial no.

6. Command: adb reboot
When you do finish something on your attached device, and you need to restart your device you use this command adb reboot
7. Command: adb reboot recovery
If you wish to reboot your device into recovery mode, say for flashing a custom ROM or rooting your device, you can issue the above command. First, your device will turn OFF, and then it will open directly into the recovery mode. If you have flashed a custom recovery on your device, you will be taken to the same instead of the stock recovery.
8. Command: adb reboot bootloader
If you want to unlock your bootloader, reboot into fast boot and recovery mode, and do some other tasks issue, adb reboot bootloader command is the complete command. It is usually applied to HTC and other devices where you get the bootloader functionality. Issuing the above command will reboot your device into bootloader mode.
9. Command: adb reboot fastboot
You can issue adb reboot fastboot command to open your device directly into fastboot mode instead of going into bootloader. Fastboot mode helps you flashing custom recoveries as well as installing custom ROM on your device.
10. Command: adb push Source Destination
The above command adb push Source Destination to send a file to your device, you just need to define source file location path and destination location path.
11. Command: adb pull FileLocation Destination
adb pull FileLocation Destination command will receive a file from your device to PC. You need to define FileLocation of your device and Destination as save path of the file in PC.
0 comments:
Post a Comment